
In couple days I’m saying goodbye to my big desktop PC for several next weeks (relocation), so time to commit some stuff to my CSharpRenderer GitHub repository that was waiting for it for way too long. 🙂
Startup time optimizations
The goal of this framework was to provide as fast iterations as possible. At first with just few simple shaders it wasn’t a big problem, but when it started growing it became something to address. To speed it up I did following two optimizations:
Gemetry obj file caching
Fairly simple – create a binary instead of loading and processing obj file text every time. On my hd in Debug mode gives up to two seconds of start-up time speed-up.
Multi-tasked shader compilation
Shader compilation (pre-processing and building binaries) is trivialy parallelizable, so I simply needed to make sure it’s stateless and only loading binaries to driver and device happens from a main, immediate context.
I highly recommend .NET Task Parallel Library – it is both super simple and powerful, has very nice syntax with lambdas and allows for complex task dependencies (child tasks, task continuations etc.). It also hides from user problematic thread vs task management (think with tasks and multi-tasking, not multiple threads!). I didn’t use all of its power (like Dataflow features which would make sense), but it is definitely worth taking into consideration when developing any form of multitasking in .NET.
Additional tools for debugging
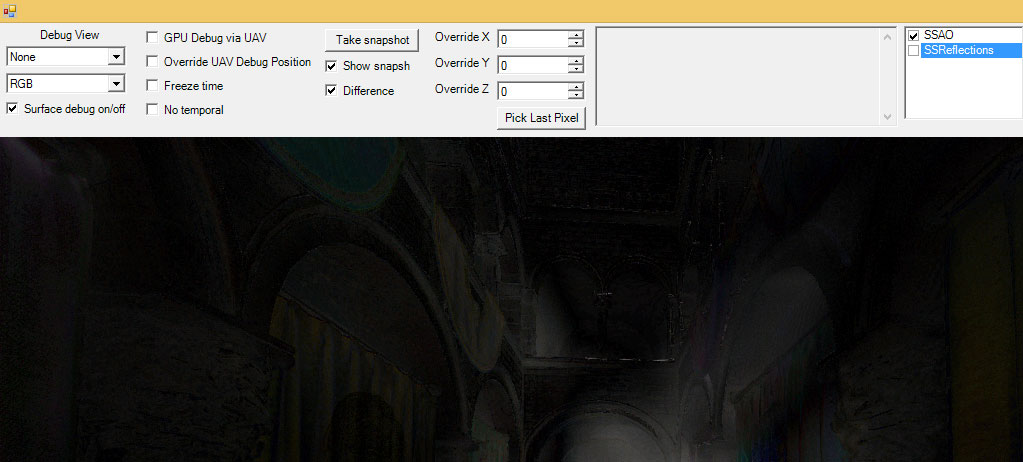
I added simple features toggles (auto-registered and auto-reloaded UI) to allow easier turning on-off from within the UI. To provide additional debugging help with this feature and also some other features (like changing a shader when optimizing and checking if anything changed quality-wise and in which parts of the scene) I added option of taking “snapshots” of final image. I supports quickly switching between snapshot and current final image or displaying snapshot vs current image difference. Much faster than reloading a whole shader.
Half resolution / bilateral upsampling helpers
Some helper code to generate offsets texture for bilateral upsampling. For every full res pixel it generates offset information that depending on depth differences between full-res and half-res pixels uses either original bilinear information (offset equal zero) or snaps to edge-bilinear (instead of quad-bilinear) or even point sampling (closest depth) from low resolution texture when depth differences are big. Benefit of doing it this way (not in every upscale shader) is much less shader complexity and potentially performance (when having multiple half res – > full res steps); also less used registers and better occupancy in final shaders.

Physically-correct env LUTs, cubemap reflections and (less correct) screen-space reflections
I added importance sampling based cubemap mip chain generation for GGX distribution and usage of proper environment light LUTs – all based on last year’s Brian Karis Siggraph talk.
I also added very simple screen-space reflections. They are not full performance (reflection calculation code is “simple”, not super-optimized) or quality (noise and temporal smoothing), more as a demonstation of the technique and showing why adding indirect specular occlusion is so important.
Screen-space reflections are temporally supersampled with additional blurring step (source of not being physically correct) and by default look very subtle due to lack of metals or very glossy materials, but still useful for occluding indirect speculars.
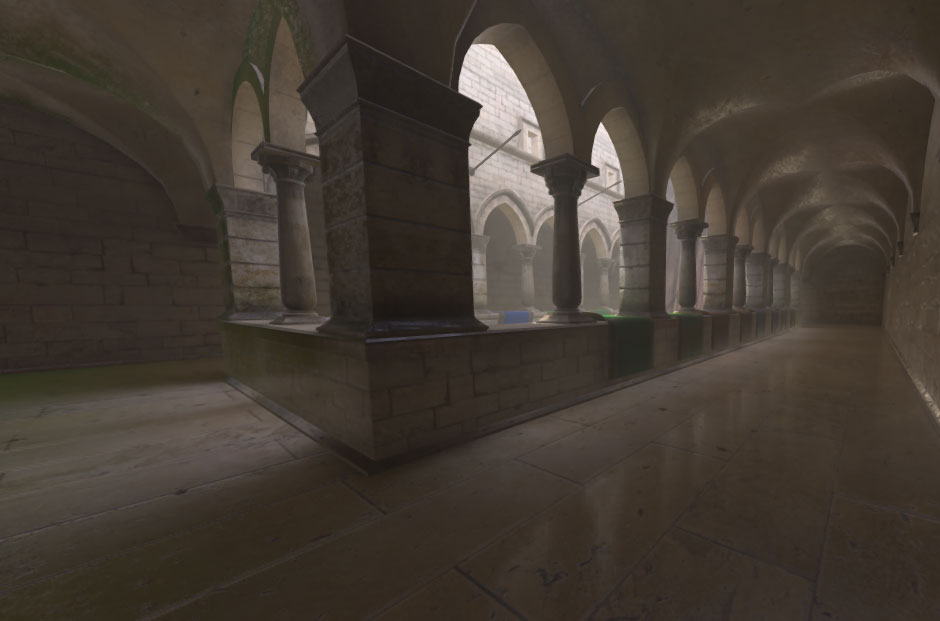

As they re-use previous frame lighting buffer we actually get multi-bounce screen-space reflections at cost of increasing temporal smoothing and trailing of moving objects.
Weather to use them or not in a game is something I don’t have a clear opinion on – my views were expressed in one of first posts in this blog. 🙂
Future
I probably won’t update the framework because of having only MacBook Pro available for at least several weeks / possibly months (unless I need to integrate a critical fix), but I plan to do quite big write-up about my experiences with creating efficient next-gen game post-processing pipeline and optimizing it – and later definitely post some source code. 🙂

Hi Bart, thank you for your blog, I’m reading it from the beginning. Although I’m in graphics world for some time it seems I’m totally lost. Can you please explain what does this means: bilateral upsampling (what this word means – bilateral), importance sampling, temporally supersampled. Thanks :).
Hi! Thanks for following my blog!
All of those topic are quite big, beyond scope of one comment… For bilateral upsampling good reference are those 2 publications: http://research.microsoft.com/apps/pubs/default.aspx?id=78272 http://developer.download.nvidia.com/assets/gamedev/files/sdk/11/OpacityMappingSDKWhitePaper.pdf
Importance sampling is a concept from offline rendering and you can google for Monte Carlo techniques, or go straight to reading a great book http://www.pbrt.org
Finally, I covered temporal supersampling already in my blog and presentations! 🙂 2 links:
Cheers!
Hi Burt,
First of all, I think you are one of the best graphics blogger on internet.
You CsharpRenderer is a Must for all people that want to know how make some cool graphics on DX11. Graphics for me it’s just a passion , unfortunately my work is another , I’m a project manager for an Italian software house that develops information systems for banks and insurance companies , not graphics here . 😦
Anyway , i start to learn basics of DX11 , porting C ++ tutorial rastertek to c # sharpdx . But I was looking for examples on postscreen effects and illumination and i found you ! Eureka !
I write my own engine (bah! engine, say some helpers class), in order to develop small graphics stuff for hobby some of this are on youtube if you have time search andrea.maxino channel.
Now I’m studing your Screen space shadow and Screen spece reflection.
This post is just to thank you for your wonderful work .. I look forward to new updates !! 🙂
P.S
Only one question, there is a reason about you use SlimDX and not SharpDX?
Cheers,
Andrea.
Forget question abou slimdx and sharpdx you respond to this in another post! 😦
Hi Bart,
I’m very interested about PBR and I have some questions about your basic PBR Shading.
Your Renderer is the only example , with source code I found that use PBR.
Reading articles on the internet about the PBR , and comparing them with your source code I figured out how it works.
The three textures giVolumeTexR, G, B, are pre-calculated textures that describe the global indirect diffuse lighting (IBL Diffuse)?
I try to enable creations of this but render method never be called, my be something wrong in (partialGUiUpdate)?
I read about PBR, that common are used two different workflows, Metalness/Specular, it seems that you use the metalness, because it’s used only albedo map, with no specular color and two parameter reflectance and roughness, are my thought correct?
I would like to extend the basic PBR in order to use Metalness and roughness map. While I fairly understand roughness map, the metalness one it’s not clear. I understand that is involved reflectance parameter. So here some note and questions about this map:
if pixel = 0 (dielectric materials)
– a constant reflectance of (0.04-0.03) is used,
– diffuse color from albedo map,
– specular color are mainly a variation of grey (Roughness map and reflectance?)
if pixel = 1 white (Metal materials)
– what reflectance is used?
– diffuse color set to 0
– Specular color and intensity from albedo.
if pixel = variation of grey (partially metallic)
– not will be used. 🙂
Can you put me in the right way.. 🙂
Thanks for All.
Hi Andrea! Those all are very interesting questions and often there is no single, easy reply – I have seen different interpretations of those parameters implemented in different engines! Though if you have some doubts about how they work in original, GGX/Disney model, I can direct you to the original source- the Disney paper. 🙂 https://disney-animation.s3.amazonaws.com/library/s2012_pbs_disney_brdf_notes_v2.pdf This is a very good read and an industry standard now.
For the engine implementations, I recommend you read those great presentations from DICE Frostbite and Epic about their PBR in-engine implementations: http://blog.selfshadow.com/publications/s2014-shading-course/frostbite/s2014_pbs_frostbite_slides.pdf http://blog.selfshadow.com/publications/s2013-shading-course/karis/s2013_pbs_epic_notes_v2.pdf http://blog.selfshadow.com/publications/s2013-shading-course/karis/s2013_pbs_epic_slides.pdf
For your question about the GI generation you need to un-comment this “false” parameter to call this method – it takes lots of time and does partial update, so instead they are pre-cached on the hard drive. 🙂
Cheers,
Bart
Hi Bart,
First of all thanks for the links amazing reading here!!
About GI, obviously I uncomment the if (flase) 🙂 , but I think there is something wrong in the loop of PartialGIUpdate methods, in fact the Texture3D.SaveTextureToFile never reach… and also if I manually save textures at the end of the loop textures (m_GIVolumeR, G, B) are all black, instead of the original once that are filled with colors.
The problem is that i don’t really understand the algorithm.. :(.
What I would like to do, is to calculate dynamically the textures only at the first frame.
However, really thanks for your answer.
Cheers,
Andrea.
The textures cannot be updated in the first frame, as it takes couple (up to 20 with many bounces) minutes to update them all!
The algorithm is simple, for every voxel cell it renders a radiance cubemap and downsamples it – that’s why it is distributed across multiple frames – 64x64x32 voxels x 6 faces x 5 bounces x every single mesh in the scene really has to take long to render.
Thanks’ now I understand. 🙂
I’ll see if I can make a generator for this textures, or find one on internet!
Pingback: Anamorphic lens flares and visual effects | Bart Wronski
So, looking at the code, it looks like you generate basically a mirror reflection texture, then blur the screen space reflection result, assigning a weight based on how close the adjacent pixels are depth wise to the pixel in question. Would another step be assigning a weight based on how close the normal is of the adjacent pixels? I would imagine, close pixels with very different normals would also have a very dissimilar reflected color. Also, there are quite a few texture samples going on with this blur, at what point does it make sense to simply cast more screen space rays to simulate roughness?
I may take a stab at some of this, right now we only use screen space reflections for roughness < 0.1f and water, so near mirror surfaces, and fall back on environment probes for everything else.
Hi, casting many rays is always better and more precise solution, but IMO its cost is not acceptable in almost any games on current GPUs. With dielectrics rough indirect speculars are almost not visible, so why spend more GPU budget on it? The cost won’t scale linearly with number of rays, but may even get exponentially worse – cache trashing. With games that often may present many characters on screen such fixed overhead is not really an option…
For weighting by normals – this is definitely some option. 🙂 In AC4 I used weighting by gloss (less registers, already sampled, cheaper comparison ALU – 1 madd instead of 3). However the more you weight and less you blur, the more noisy will be the end result… Also averaging many normals directions approximates rough surfaces pretty well – as it is approximation of localized many rays directions. Killzone: Shadow Fall used no weighting at all, instead generated full blurred mip chain of reflection results (check presentations by Michal Valient) – and the game looked fantastic. 🙂
I agree Killzone SF looked fantastic, IMO set the standard until only recently.
I’m really thankful for your samples, previously I tried blurring the previous frame buffer ( before post processing ) and then the screen space reflection shader sampled blurred mips of it. You get blurred reflections but hard edges between objects of different depth – looked awful for roughness over about 0.2, so I abandoned it and just used SSR for mirror and very low roughess and thats it. Ive got a lot of stuff to work with in my head when I redo it – thanks again.
Pingback: Bilateral Mesh Denoising – Dreams of flashy pixels (on a white website)
Pingback: Local linear models and guided filtering – an alternative to bilateral filter | Bart Wronski