
Hey, it’s been a while since my last post. Today I will focus on topic of post-effects. Specifically, I wanted to talk about next-gen post process pipeline and redesign I worked on while being a part of Far Cry 4 rendering team. While I’m no longer Ubisoft employee and my post won’t represent the company in any way and can’t share for example internal screenshots and debug views of buffers and textures I don’t have access to anymore, I think it is a topic worth discussing just in “general” way and sharing and some ideas could be useful for other developers. Some other aspects of the game were discussed in Michal Drobot’s presentation [1]. Also at the GDC 2015 Steve McAuley will talk about Far Cry impressive lighting and vegetation technology [9] and Remi Quenin about game engine, tools and pipeline improvements [12] – if you are there, be sure to check their presentations!
Whole image post-processing in 1080p on consoles took around 2.2ms.
Introduction
Yeah, image post processing – usual and maybe even boring topic? It was described by almost every game developer in detail during previous console generation. Game artists and art directors got interested in “cinematic” pipelines and movie-like effects that are used to build mood, attract viewers’ attention to specific parts of the scene and in general – enhance the image quality. So it was covered very well and many games got excellent results. Still, I believe that most games post-effects can be improved – especially given new, powerful hardware generation.
Definition of a post-effect can be very wide and cover anything from tone-mapping through AA up to SSAO or even screen space reflections! Today I will cover only “final” post effects that happen after the lighting, so:
- Tonemapping,
- Depth of field,
- Motion blur,
- Color correction,
- “Distortion” (refraction),
- Vignetting,
- Noise/grain,
- Color separation (can serve as either glitch effect or fake chromatic aberration),
- Various blur effects – radial blur, gaussian blur, directional blur.
I won’t cover AA – Michal Drobot described it exhaustively at Siggraph and mentioned some his work on SSAO during Digital Dragons presentation. [1]
State of the art in post-effects
There were many great presentations, papers and articles about post effects. I would like to just give some references to great work that we based on and tried to improve in some aspects:
– Crytek presentations in general, they always emphasize importance of highest quality post-effects. I recommend especially Tiago Sousa’s Siggraph 2011-2013 presentations. [2]
– Dice / Frostbite smart trick for hexagonal bokeh rendering. [3]
– Morgan McGuire work together with University of Montreal on state of the art quality in motion blur. [4]
– And recent amazing and comprehensive publication by Jorge Jimenez, expanding work of [4] and improving real-time performance and plausibility of visual results. [5]
Motivation
With so many great publications available, why we didn’t use exactly same techniques on Far Cry 4?
There are many reasons, but main one is – performance and how effects work together. Far Cry 3, Blood Dragon and then Far Cry 4 are very “colorful” and effect heavy games, it is part of game’s unique style and art direction. Depth of Field, motion blur, color correction and many others are always active and in heavy combat scenes 4-6 other effects kick in! Unfortunately they well all designed separately, often not working very well and they were not working in HDR – so there were no interesting effects like bright bokeh sprites. But even with simple and LDR effects, their frame time often exceeded 10ms! It was clear to us that we needed to address post-processing in unified manner. So re-think, re-design and re-write their pipeline completely. We got a set of requirements from the art director and fx artists:
– Depth of field had to produce circular bokeh. I was personally relieved! 🙂 I wrote already about how much I don’t like hexagonal bokeh and why IMO it makes no sense in games (low-quality/cheap digital camera effect vs human vision and high definition cameras and cinematic lenses). [6]
– They wanted “HDRness” of depth of field and potentially other blur and distortion effects. So bright points should cause bright motion blur streaks or bokeh circles.
– Proper handling of near and far depth of field and no visible lerp blend between sharp and blurred image – so gradual increase/decrease of CoC.
– Many other color correction, vignetting, distortion (refraction) and blur effects.
– Motion blur to work stable and behave properly in high-velocity moving vehicles (no blurring of the vehicle itself) without hacks like masks for foreground objects.
– Due to game fast tempo and many objects moving, lots of blurs happening all the time – no need for proper “smearing” of moving objects; at first art director prioritized per-object MB very low – fortunately we could sneak it in for almost free and getting rid of many artifacts with previous, “masked” motion blur.
– Most important – almost all effects active all the time! DoF was used for sniper rifle aiming, focus on main weapon, binoculars, subtle background blurring etc.
The last point made it impossible to go with many techniques in 1080p and with good performance. We I made ourselves a performance goal – around 2ms spent on post-effects total (not including post-fx AO and AA) per frame on consoles.
Some general GCN/console post-effect performance optimization guidelines
Avoid heavy bandwidth usage. Many post-effects do data multiplication and can eat huge amounts of available memory bandwidth. Anything done to operate on smaller targets, smaller color bit depth, cutting number of passes or other forms of data bw compression will help.
Reduce your number of full screen passes as much as possible. Every such pass had cost associated with reading and outputting a full screen texture – there is some cache reload cost as well as exports memory bandwidth costs. On next-gen consoles it is relatively small, smaller cost than on x360 (when you had to “resolve” after every pass if you wanted to read data back) even in way higher resolution, but in 1080p and with many passes and effects it adds up!
Avoid weird data-dependent control flows to allow efficient latency hiding. I wrote about latency hiding techniques in GCN architecture some time ago [7] and suggested that this architecture in case of many needed samples (so typical post-effect use-case) benefits rather from batching samples together and hiding latency without wave switching. Therefore any kind of data-dependent control flow will prevent this optimization –watch out for branches (especially dynamically calculating required number of samples – often planning for worst case works better! But take it with a grain of salt – sometimes it is good to dynamically reject for example half of samples; just don’t rely on a dynamic condition that can take 1-N samples!).
With efficient GPU caches it is easy to see “discrete performance steps” effect. What I mean is that often adding a new sample from some texture won’t make the performance worse – as GPU will still fit +/- same working set in cache and will be able to perfectly hide the latency. But add too many source textures or increase their size and suddenly timing can increase even 2 times! It means you just exceeded optimal cache working size and started to trash your caches and cause their reloading. This advice doesn’t apply to ALU – it scales almost always with the number of instructions and if you are not bw-bound it is always worth to do some fast math tricks.
Often previous console generation advices are counterproductive. One example is practice from previous consoles to save some ALU in PS by moving trivial additions (like pixel offsets for many samples) to VS and relying on hardware triangle parameter interpolation – this way we got rid of some instructions and if we were not interpolation bound we observed only performance increase. However, on this architecture there is nothing like hardware interpolation – all interpolation is done in PS! Therefore such code can be actually slower than such additions in PS. And thanks to “sample with literal offset” functions (last parameter of almost all Sample / SampleLevel / Gather functions) if you have fixed sample count you probably don’t need to do any ALU operations at all!
Be creative about non-standard instruction use. DX11+ has tons of Sample and Gather functions and they can have many creative uses. For example to take N horizontal samples from 1 channel texture (with no filtering) it is better to do N/2 gathers and just ignore half of gathered results! It really can make a difference and allow for many extra passes with timings of e.g. 0.1ms.
Finally, I would like to touch a quite controversial topic and this is my personal opinion – I believe that designing visual algorithms and profiling runtime performance we should aim to improve the worst case, not the average case. This point is valid especially with special (post) FX – they kick in already when scenery is heaviest for the GPU because of particles, many characters and dynamic camera movement. I noticed that many algorithms rely on forms of “early outs” and special optimal paths. This is great as an addition and to save some millis, but I wouldn’t rely on it. Having such fluctuations makes it much harder for technical artists to optimize and profile the game – I prefer to “eat” some parts of the budget even if the effect is not visible at the moment. There is nothing worse than stuttering in action-heavy games during those intensive moments when the demand for interactivity is highest! But as I said, this is a controversial topic, I know many great programmers who don’t agree with me. There are no easy answers and single solutions – it depends on specific case of game, special performance requirements etc. For example probably hitting 60fps most of the time with occasional drops to 30fps would be better than constant 45 v-synced to 30.
Blur effects
Whole idea for the pipeline is not new or revolutionary; it appeared on many internet forums and blogs for a long time (Thanks to some people I have the reference I was talking about – thanks! [13]). It is based on observation that all blurs can be combined together if we don’t really care about their order. Based on this we started with combining motion blur and depth of field, but ended up including many more blurs: whole-screen blur, radial blur and directional blur. Poisson disk of samples can be “stretched” or “rotated” in given direction, giving blur directionality and desired shape.
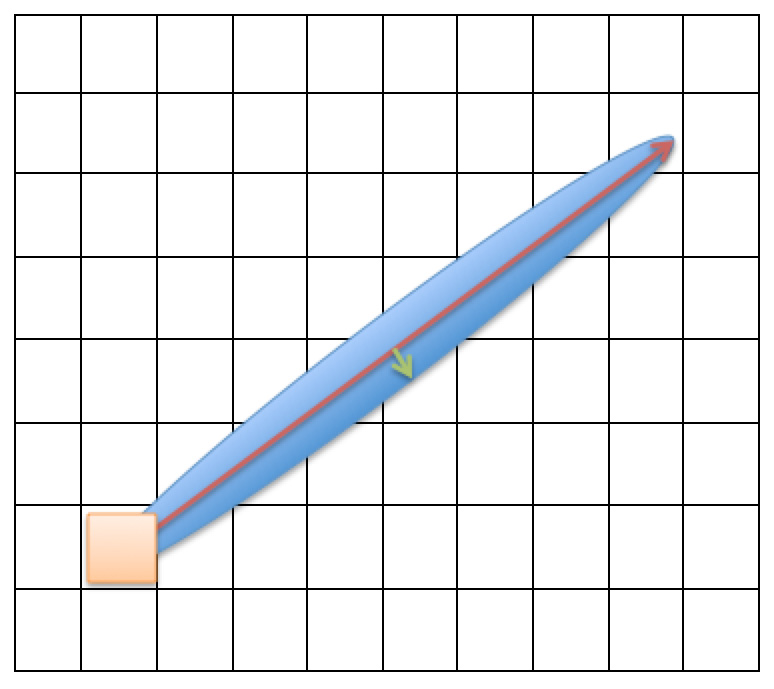
Stretching of CoC Poisson disk in the direction of motion vector and covered samples.
If you do it in half screen resolution, take enough samples and calculate “occlusion” smartly – you don’t need more than one pass! To be able to fake occlusion we used “pre-multiplied alpha” approach. Blur effect would be feeded 2 buffers:
- Half resolution blur RGB parameters/shape description buffer. Red channel contained “radius”, GB channels contained directionality (signed value – 0 in GB meant perfectly radial blur with no stretch).
- Half resolution color with “blurriness”/mask in alpha channel.
In the actual blur pass we wouldn’t care at all about the source of blurriness – just did 1 sample from blur shape buffer, and then did 16 or 32 samples (depending if it was a cut-scene or not) from color buffer, weighting by color alpha and renormalizing afterwards – that’s all! 🙂
How blur shape and blurriness alpha/mask would be calculated? It was mixture of samples from motion vectors buffer, Circle of Confusion buffer, some artist-specified masks (in case of generic “screen blur” effect) and some ALU for radial blur or directional blur.
Ok, but what about desired bleeding of out-of-focus near objects to sharp in-focus background objects? We used a simple trick of “smearing” the circle of confusion buffer – blurred objects in front of focus plane would blur their CoC on sharp in-focus objects. To extend near objects CoC efficiently and not to extend far-blur objects onto sharp background we used signed CoC. Objects behind the focus plane had negative CoC sign and during the CoC extension we would just simply saturate() fetched value and calculate maximum with unclamped, original value. No branches, no ALU cost – the CoC extension was separable and had some almost-negligible cost of AFAIR 0.1ms.

Synthetic example of DoF CoD without near depth extension.

Synthetic example of DoF CoD with near depth extension. Notice how only near CoC extends onto sharp areas – far CoC doesn’t get blurred.
Obviously it was not as good as proper scatter-as-gather approaches and what Jorge Jimenez described in [5], but with some tweaking of this blur “shape” and “tail” it was very fast and produced plausible results.
Whole pipeline overview
You can see very general overview of this pipeline on following diagram.

Steps 1-3 were already explained, but what also deserves some attention is how bloom was calculated. Bloom buffers used fp 11-11-10 color buffers – HDR, when pre-scaled precision was high enough, good looking, and 2x less bandwidth!
For the blur itself, we borrowed idea from Martin Mittring’s Unreal Engine 4 presentation [8]. Mathematical background is easy – according to Central Limit Theorem average of many randomly distributed variables with many distributions including uniform one converges to Gaussian variable distribution. Therefore we approximated Gaussian blur with many octaves of efficiently box-sampled bloom thresholded buffer. Number of samples for every pass was relatively small to keep data in L1 cache if possible, but with many those passes combined effect approached nicely a very wide Gaussian curve. They were combined together to ½ resolution buffer in step 4 with applied artist-specified masks and typical “dirty lens” effect texture (only the last octaves contributed to the dirty lens). There was also combine with “god-rays”/”lens-flare” post-effect in this step, but I don’t know if it was used in final game (cost was negligible, but it definitely is a past-gen effect…).
Most complex, most expensive and only full-screen resolution pass was 5.
It combined not only bloom, half-resolution blurs and sharp image, but also performed tone-mapping operator, 3D texture color correction and other ALU texture operations and simple ALU-based noise/dithering effect (magnitude of noise calculated to be at least 1 bit of sRGB). Please note that the tone-mapping didn’t include the exposure – it was already exposed properly in lighting / emissive / transparent shaders. It allowed for much better color precision, no banding and easier to debug color buffers. I hope that Steve McAuley will describe it more in his GDC talk as part of lighting pipeline he designed and developed.
But what I found surprising performance-wise and I think is worth sharing was that we also calculated distortion /refraction and color separation in there. It was cheaper to do color separation as 3x more samples in every combined buffer! Usually they were not very far away from original ones and it was localized in screen-space and within adjacent pixels, so there was not so much additional cost for those passes! Separate passes for those effects were more expensive (and harder to maintain) than this single “uber-pass”. There were many more different passes combined in there and we applied similar logic – sometimes it is possible to calculate a cascade of effects in a single pass. It allows for saving bandwidth, reducing export cost and improved latency hiding – and post process effect usually don’t have dependent flow in code, so even with lower occupancies performance is great and the latency hidden.
Summary
Described solution performed very fast (and the worst case was only a bit slower than the average) gave nice and natural effects. The way all effects were united and working together allowed for good color precision. As it was called from a single file and the order was clearly defined in one shader file, it was easy to refactor, maintain and change it. Single blur shader provided great performance optimization but also improved the quality (affordable to take many samples).
However, there are some disadvantages of this technique.
– There were some “fireflies”. Artifacts caused by too big smearing of bright HDR pixels, especially when doing some intermediate steps in partial resolution. Smart and fast workaround for it seems to be weighting operator suggested by Brian Karis. [11] It would come at almost no additional cost (already doing premul alpha weighting). However it would mean that artists would lose some of HDR-ness of DoF. So as always – if you cannot do “bruteforce” supersampling, you have to face some trade-offs…
-There was no handling of motion blurred objects “smearing” at all. If you find it a very important feature, then probably it would be possible to do some blurring / extension on motion vectors buffer with taking occlusion into account – but such pass even in half res would add some extra cost.
– Circle of confusion extension/blur for near-objects was sometimes convincing, but sometimes looked artificial. It depended a lot on tweaked parameters and fudge factors – after all, it was a bit “hack”, not proper realistic sprite-based scatter solution. [6]
– Finally, there were some half resolution artifacts. This is pretty self-explainatory. Worst one was caused by taking bilinear samples from half resolution blur “mask” stored in blur buffers alpha channels. Worst case was when moving fast along a wall. Gun was not moving in screen space, but the wall was moving very fast and it accidentally was grabbing some samples from gun outline. We experimented with more aggressive weighting, changing depth minimizing operator to “closest” etc., but it only made the artifact less visible – it still could appear in case of very bright specular pixels. Probably firefly reduction weighting technique could help here. Also 3rd person games would be much less prone to such artifact.
References
[1] http://michaldrobot.files.wordpress.com/2014/08/hraa.pptx
[2] http://www.crytek.com/cryengine/presentations
[3] http://publications.dice.se/attachments/BF3_NFS_WhiteBarreBrisebois_Siggraph2011.pptx
[4] http://graphics.cs.williams.edu/papers/MotionBlurHPG14/
[5] http://advances.realtimerendering.com/s2014/index.html#_NEXT_GENERATION_POST
[6] https://bartwronski.wordpress.com/2014/04/07/bokeh-depth-of-field-going-insane-part-1/
[7] https://bartwronski.wordpress.com/2014/03/27/gcn-two-ways-of-latency-hiding-and-wave-occupancy/
[8] http://advances.realtimerendering.com/s2012/index.html
[9] http://www.gdconf.com/news/see_the_world_of_far_cry_4_dec.html
[10] http://www.eurogamer.net/articles/digitalfoundry-2014-vs-far-cry-4
[11] http://graphicrants.blogspot.com/2013/12/tone-mapping.html
[13] http://c0de517e.blogspot.com.es/2012/01/current-gen-dof-and-mb.html

Did you have any problems with thin objects(alpha tested foliage) without smear on motion blur?
Hi, lack of smearing could be visible only on actually fast moving objects like cars or characters, but due to general fast game tempo you never see this problem in general gameplay. It would be visible only… on screenshots. 🙂
Hi Bart,
my be a little off topic, but I would be pleased to know what do you think about modern real-time Global illumination systems as a feature of modern game engine.
Of course it would be dependent on the type of the game, but plus in generally your thought and as your aesthetic sense.
For instance, UE4 doesn’t have real-time GI, crytek does, but there aren’t great difference on quality of images produced.
Reading on internet, I found that there are many attempt to calculate this in real time (VXGI,… SSDO (screen spaced), spherical harmonic.. and so on), do you think that pro, like better visual quality, aren’t compensate by cons like latency?
cheers
Andrea.
Hi Andrea,
In Unreal Engine 4 there is approximate real time GI technique – light propagation volumes – actually the same that Crytek does. 🙂
And for the question, this is a bit like asking on a doctor conference “hey, I was wondering what was the best cure for cancer?” – as real-time GI is and will be simply unsolved problem… The amount of data to fully solve the lighting equation without pre-computing is too large to process… 😦 Every existing technique has either quality problems (LPV) or prohibitive performance (cone-traced voxel GI). So unfortunately there is no single good real time GI technique. Actually most shipped games (I would say over 3/4?) don’t use any of them and most in-production titles don’t plan either – and rely on baked lighting.
Cheers,
Bart
Thanks, great post.
> ALU-based noise/dithering effect (magnitude of noise calculated to be at least 1 bit of sRGB)
Are there any links or references on this sort of thing? I’ve always been curious how scratches/dust/grain is achieved in AAA titles.
Hey Matt, it all depends on title. Usually scratches/dust are a separate, artist-authored effect and is using a texture created by fx artists. For the grain it is also possible to use similar approach – artist authored texture that is tileable and the offset generated randomly every frame. However to get natural-looking camera noise / grain / dithering it is usually cheaper and better to get procedural noise / random numbers seeded with a different value every frame. The best article on that topic that I can recommend is http://www.reedbeta.com/blog/2013/01/12/quick-and-easy-gpu-random-numbers-in-d3d11/ . I am currently using Wang hash + some optional iterations and advocate its use. 🙂 One simple trick to provide artists control over its shape/look is adding a low-pass filter (by averaging with values of neighbors), this seems to produce coarser, more film-like noise. But most games I have seen so far don’t even bother to do it.
Cheers,
Bart