
In this blog post, I wanted to address something that I was thinking about for many years – since starting working on rendering in video games and with HDR workflows and having experience with various photographic techniques. For the title of the article, I can immediately give you an answer – “it depends on the content”, and you could stop reading it. 🙂
However, if you are interested in what is localized tonemapping and why it’s an useful tool, I’ll try to demonstrate some related concepts using personal photographs and photographic experiments as well as screenshots from Sony Santa Monica’s upcoming new God of War and the demo we have shown this year at E3.
Note: all screenshots have some extra effects like bloom or film grain turned off – not to confuse and to simplify reasoning about them. They are also from an early milestone, so are not representative of final game quality.
Note 2: This is a mini-series. A second blog post accompanies this one. It covers some notes about dynamic range, gamma operations, tonemapping operators, numerical analysis and notes about viewing conditions.
Global exposure and tonemapping
Before even talking about tonemapping and the need of localized exposure, I will start with simple, global exposure setting.
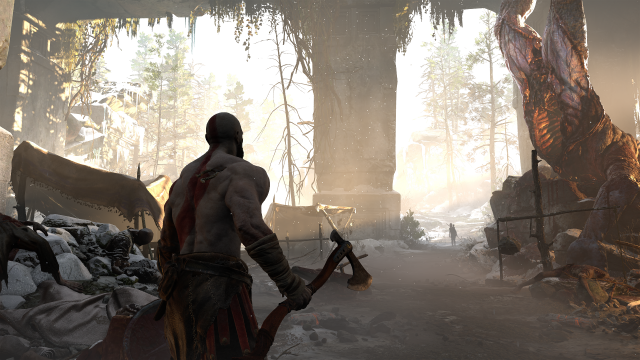
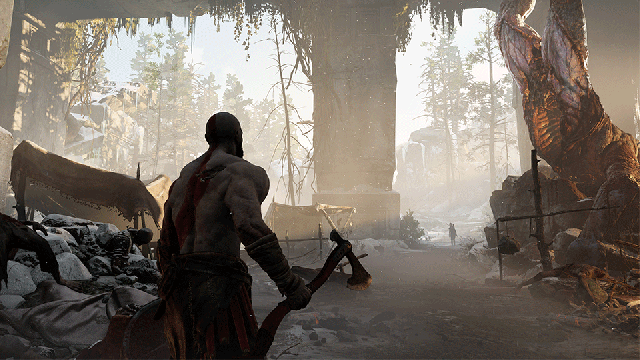
Let’s start with a difficult scene that has some autoexposure applied:

For whole demo for lighting we used reference physical radiance values for natural light sources (sky, sun) and because of the scene taking place in a cave, you can already see that it has pretty big dynamic range.
I won’t describe here all the details of the used autoexposure system (pretty standard; though I might describe it in future blog post or in some presentation), but due to its center weighted nature it slightly underexposed lots of details in the shade at the bottom of the screen – but outdoors are perfectly exposed. In most viewing conditions (more about it in a second post) shadows completely lost all details, you don’t understand the scene and main hero character is indistinguishable…
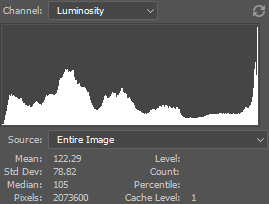
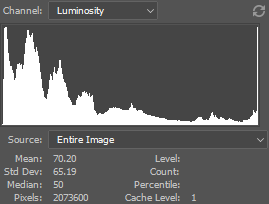
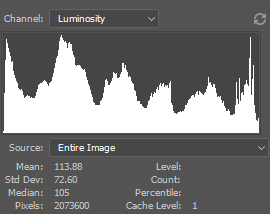
Let’s have a look at the histogram for the reference:

Interesting observation here is that even though big area of the image is clearly underexposed, there is still some clipping in whites!
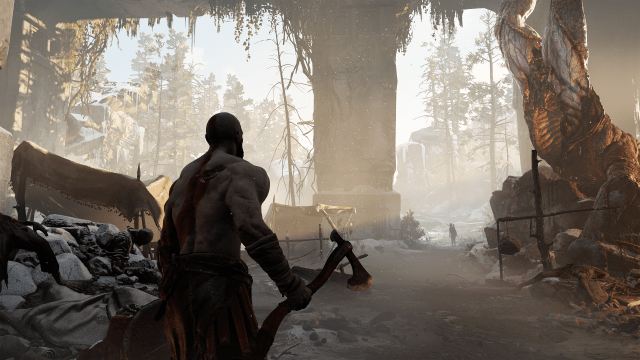
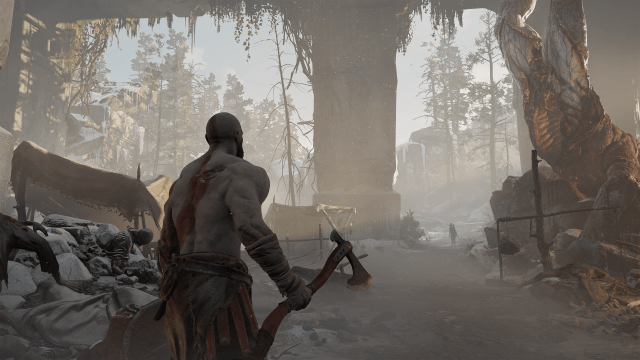
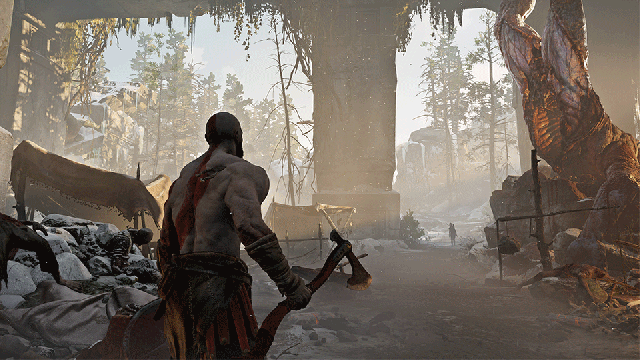
Let’s quickly fix it with an artist-exposed exposure bias:
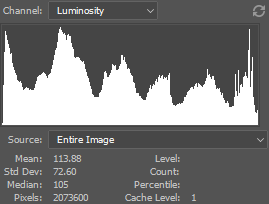
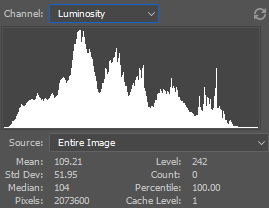
And have a look at the histogram:
Hmm, details are preserved slightly better in shadows (though they still look very dark – as intended) and the histogram is more uniform, but whole outdoor area is completely blown out.
I have a confession to make now – for the purpose of demonstration I cheated here a bit and used linear tonemapping curve. 🙂 This is definitely not something you would like to do, and for as why there are excellent presentations on the topic. I want to point to two specific ones:
First one is a presentation from a 2010 Siggraph course organized by Naty Hoffman – “From Scene to Screen” by Josh Pines. It describes how filmic curves were constructed and what was the reasoning behind their shape and in general – why we need them.
Second one is from GDC 2016 by Timothy Lottes “Advanced Techniques and Optimization of HDR Color Pipelines” and covers various topics related to displaying High Dynamic Range images.
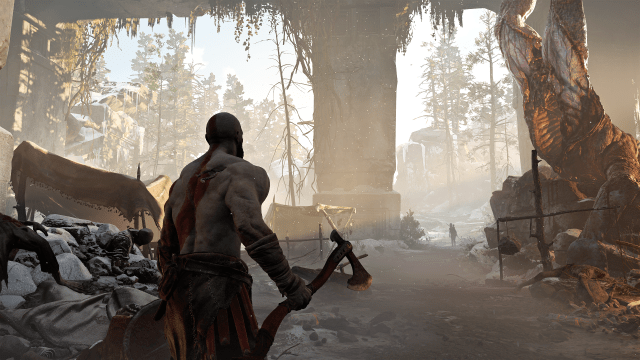
So, this is the scene with correct, filmic tonemapping curve and some adjustable cross-talk:
And the histogram:
Much better! Quite uniform histogram and no blown whites (in game bloom that is additive would make whites white).
I made a gif of the difference before/after: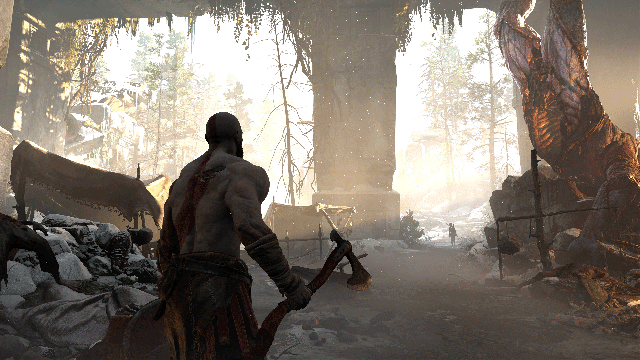
And the animation of all three histograms:
Much better! Few extra stops of dynamic range, lots of details and saturation preserved in bright areas. However, histogram still contains many completely black pixels, there is a large spike in lower 10th percentile and depending on the viewing conditions, scene might still be too dark…
Gamma / contrast settings
Why not just reduce the dynamic range of the image? Raising linear pixel values to some power and rescaling are equivalent of logarithmic EV space scaling and shifting and can give result that looks like that:
Definitely all details are visible, but does the scene look well? In my opinion not; everything is milky, washed out, boring and lacks “punch”. Furthermore, both environments and characters started to look chalky. Due to perceptual character of per-channel gamma adjustments, not only contrast, but also saturation is lost. Even histogram shows the problem – almost no whites nor blacks in the scene, everything packed into grays!
Check this gif comparison:

Does this problem happen in real life / photography?
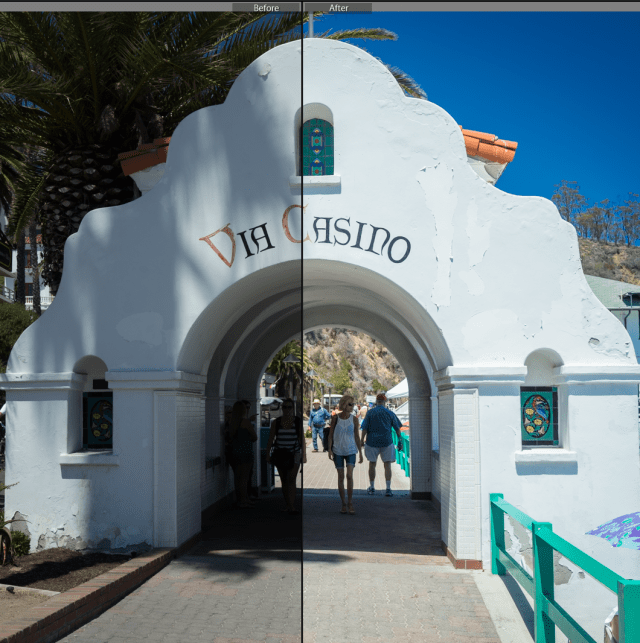
Yes, obviously it does! Here is a photo from Catalina Island – you can notice on the left how camera took an underexposed picture with extremely dark shadows with zero detail – and on the right how I corrected it to feel more perceptually correct and similar to how I saw the scene.
So can we do anything about it? Yes, we can! And I have teased with the photograph above what is the solution.
But first – some question that probably immediately pop up in a discussion with lighting artists.
Why not just change the lighting like they do in movies?
The answer often is – yes, if you can do it right, just adjust lighting in the scene to make dynamic range less problematic. We interviewed recently many lighters coming from animation and VFX and usually as a solution for large scene dynamic range they mention just adding more custom lights and eyeballing it until it looks “good”.
Obviously by using the word right in my answer, I kind of dodged the question. Let me first explain what it means in real-life photography and cinematography with some random youtube tutorials I have found on the topic. It means:
Diffusors
Pieces of some material that partially transmits light, but completely diffuses the directionality and source position of lighting. Equivalent of placing large area light in rendered scene and masking out original light.
Reflectors
Simply a surface that bounces lighting and boosts lighting on shadowed surfaces and ones not facing the light direction.
In a game scene you could either place white material that would produce more GI / bounced lighting, or simply in a cinematic place a soft (area) fill light.
Additional, artificial light sources (fill flash, set lights etc.)
This is pretty obvious / straightforward. Movie sets and games with cinematic lighting have tons of them.
So as you can see – all those techniques apply to games! With constrained camera, camera cuts, cinematics etc. you can put in there fill lights and area lights and most games (with enough budget) do that all the time.
This is also what is possible in VFX and animation – manually adding more lights, fixing and balancing stuff in composition and just throwing more people at the problem…
Note: I think this is good, acceptable solution and in most cases also the easiest! This is where my answer “it depends” for the question in the title of this article comes from. If you can always add many artificial, off-screen light sources safely and your game content allows for it and you have great lighters – then you don’t need to worry.
Is it always possible in games and can get us good results?
No. If you have a game with no camera cuts or simply need perfect lighting in conditions with 100% free camera, you cannot put invisible light source in the scene and hope it will look well.
On the other hand, one could argue that there is often place for grounded light sources (torch, fire, bulbs… name it) and sure; however as often they can make no sense in the context and level design design of the scene, or you might have no performance budget for them.
Hacking Global Illumination – just don’t!
Some artists would desperately suggest “let’s boost the GI!” “let’s boost bounced lighting!” “let’s boost just the ambient/sky lighting intensity!” and sometimes you could get away with that on previous generation of consoles and non-PBR workflows, but in PBR pipeline, it’s almost impossible not to destroy your scene this way. Why? Large family of problems it creates is balance of specular and diffuse lighting.
If you hack just diffuse lighting component (by boosting the diffuse GI), your objects will look chalky or plastic and your metals will be too dark; other objects sometimes glow in the dark. If you boost also indirect speculars, suddenly under some conditions objects will look oily and/or metallic; your mirror-like glossy surfaces will look weird and lose sense of grounding.
Finally, this is not only GI specific, but applies to any hacks in PBR workflow – when you start hacking sun/sky/GI intensities, you lose ability to quickly reason about material responses and the lighting itself and debugging them – as you can’t trust what you see and many factors can be the source of the problem.
How photography deals with the problem of too large dynamic range when operating with natural light?
This is a very interesting question and my main source of inspiration to the solution of this problem. Especially in the film / analog era, photographers had to know a lot about dynamic range, contrast, various tonemapping curves. Technique and process were highly interleaved with artistic side of photography.
One of (grand)fathers of photography, Ansel Adams created so-called Zone system.
https://en.wikipedia.org/wiki/Zone_System
http://photography.tutsplus.com/tutorials/understanding-using-ansel-adams-zone-system–photo-5607
https://luminous-landscape.com/zone-system/
I won’t describe it in detail here, but it is very similar to many principles that we are used to – mapping middle gray, finding scene dynamic range, mapping it to media dynamic range etc.
Fascinating part of it is the chemical/process part of it:
Picking correct film stock (different films have different sensitivity and tonemapping curve shape), correct developer chemical, diluting it (my favourite developer, Rodinal can deliver totally different contrast ratios and film acuity/sharpness depending on the dilution), adjusting development time or even frequency of mixing the developed film (yes! 1 rotation of development tank a minute can produce different results than 1 rotation every 30 seconds!).
Photo captured on Fuji Neopan developed in diluted Agfa Rodinal – absolutely beautiful tonality and low contrast, high acuity film.
Manual localized exposure adjustment
This all is interesting, but also in global tonemapping / per-image, global process domain. What photographers had to do to adjust exposure and contrast locally, was tedious process called dodging and burning.
https://en.wikipedia.org/wiki/Dodging_and_burning
It meant literally filtering or boosting light during print development. As film negatives had very large dynamic range, it made it possible to not only adjust exposure/brightness, but recover lots of details in otherwise overblown / too dark areas.
An easy alternative that works just great for landscape photography is using graduated filters:
https://en.wikipedia.org/wiki/Graduated_neutral-density_filter
Or even more easily, by using polarizer (darkens and saturates the sky and can cancel out specular light / reflections on e.g. water).
https://en.wikipedia.org/wiki/Polarizing_filter_(photography)
Fortunately in digital era, we can do it much easier with localized adjustment brushes! This is not very interesting process, but it’s extremely simple in software like Adobe Lightroom. Some (stupid) example of manually boosting exposure in shadows:

As localized adjustment brush with exposure is only exposure addition / linear space multiplication (more about it in second post in the series!), it doesn’t affect contrast in modified neighborhood.
It is worth noting here that such adjustment would be probably impossible (or lead to extreme banding / noise) with plain LDR bmp/jpeg images. Fortunately, Adobe Lightroom and Adobe Camera Raw (just like many other similar deticated RAW processing format) operate on RAW files that are able to capture 12-16 exposure stops of dynamic range with proper detail! Think of them as of HDR files (like EXR), just stored in a compressed format and containing data that is specific to the input device transform.
This is not topic of this post, but I think it’s worth mentioning that on God of War we implemented similar possibility for lighting artists – in form of 3D shapes that we called “exposure lights”. Funnily they are not lights at all – just spherical, localized exposure boosters / dimmers. We used dimming possibility in for example first scene of our demo – Kratos reveal, to make him completely invisible in the darkness (there was too much GI 🙂 ) and we use brightness boosting capabilities in many scenes.
Automatic localized adjustments – shadows / highlights
Manual localized exposure adjustments are great, but still – manual. What if we could do it automatically, but without reducing whole image contrast – so:
a) automatically
b) when necessary
c) preserving local contrast?
Seems like Holy Grail of exposure settings, but let’s have a look at tools already at photographers/artists disposal.
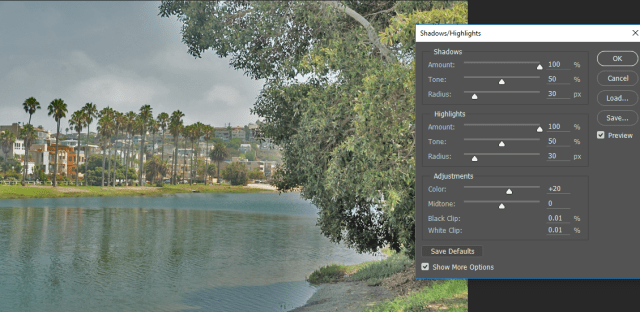
Enter… Shadows / Highlights! This is an image manipulation option available in Adobe Photoshop and Lightroom / Camera Raw. Let’s have a look at some image with normal exposure, but lots of bright and dark areas:
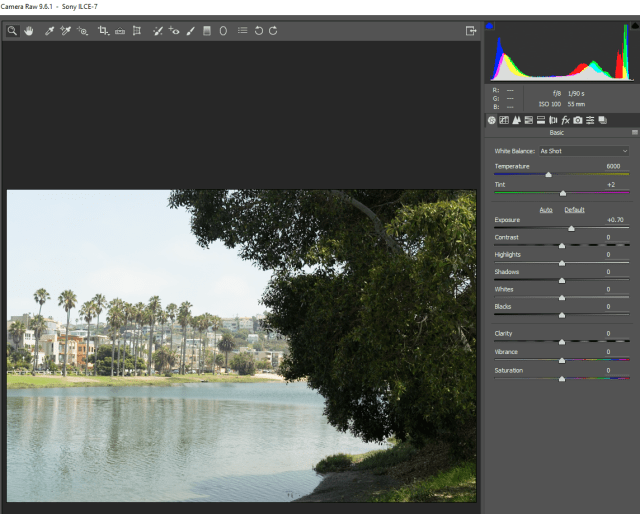
We can boost separately shadows:
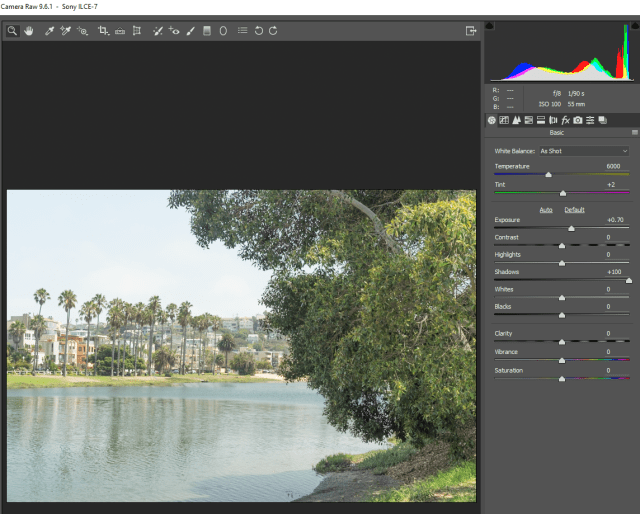
(notice how bright the trees got – with slight “glow” / “HDR-look” (more about it later).
Now highlights:

Notice more details and saturation in the sky.
And finally, both applied:
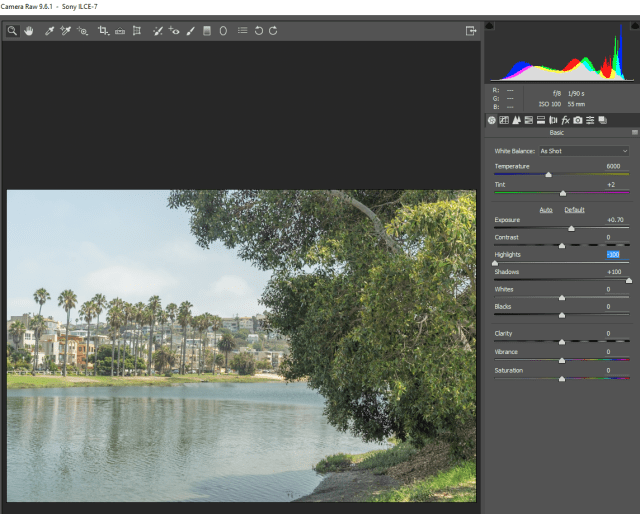

What is really interesting, is that it is not a global operator and doesn’t only reshape exposure curve. It’s actually a contrast-preserving, very high quality localized tonemapping operator. Halo artifacts are barely visible (just some minor “glow”)!
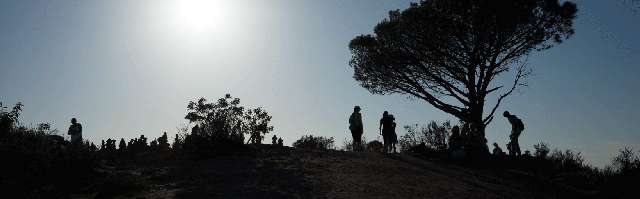
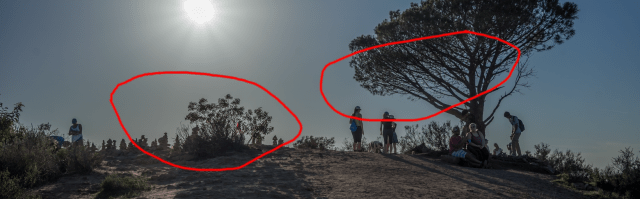
Here is an extreme example that hopefully shows those artifacts well (if you cannot see them due to small size – open images in a separate tab):
Interestingly, while ACR/Lightroom HDR algorithm seems to work great until pushed to the extreme, same Shadows/Highlights looks quite ugly in Photoshop in extreme settings:
Aaaargh, my eyes! 🙂 Notice halos and weird, washed out saturation.
Is the reason only less information to work with (bilateral weighting in HDR can easily distinguish between of -10EV vs -8EV while 1/255 vs 2/255 provides almost no context/information?) or a different algorithm – I don’t know.
Actual algorithms used are way beyond scope of this post – and still a topic I am investigating (trying to minimize artifacts for runtime performance and maximize image quality – no halos), but I was playing with two main categories of algorithms:
- Localized exposure (brightness) adjustments, taking just some neighborhood into account and using bilateral weighting to avoid halos. I would like to thank here our colleagues at Guerilla Games for inspiring us with an example of how to apply it in runtime.
- Localized histogram stretching / contrast adjustment – methods producing those high structure visibility, oversaturated, “radioactive” pictures.
There are obviously numerous techniques and many publications available – sadly not many of them fit in a video game performance budget.
In “God of War”
Enough talking about photography and Adobe products, time to get back to God of War!
I implemented basic shadows/highlights algorithm with artist tweakable controls and trying to match behavior of Lightroom. First screenshot shows a comparison of “shadows” manipulation and regular, properly tonemapped screenshot with a filmic tonemapping curve.

I set it to some value that is relatively subtle, but still visible (artists would set it from more subtle settings to more pronounced in gameplay-sensitive areas). Now the same with highlights options:

One thing that you might notice here is haloing artifacts – they result from both relatively strong setting as well as some optimizations and limitations of the algorithm (working in lower/partial resolution).
Finally, with both applied:


As I mentioned – here it is shown in slightly exaggerated manner and showing artifacts. However, it’s much better than regular “gamma” low contrast settings:

Histogram shows the difference – while gamma / contrast operator tends to “compact” the dynamic range and pack it all in midtones / grays, shadows/highlights operations preserve local contrast, saturation and some information about darkest and brightest areas of the image.
Why localized exposure preserves contrast and saturation? Main difference is that gamma in logarithmic space becomes scale, scaling whole histogram, while exposure/scale becomes just a linear shift (more about it in part 2) and shifts under / over exposed parts with same histogram shape into visible range.
Summary
You can check the final image (a bit more subtle settings) here:
To sum up – I don’t think that problems of exposure and dynamic range in real time rendering are solved. Sometimes scenes rendered using realistic reference values have way too large dynamic range – just like photographs.
We can fix it with complicated adjustments of the lighting (like they do on movie sets), some localized exposure adjustments (in 3D “exposure lights”) or using simple “procedural” image space controls of shadows/highlights.
Possible solutions depends heavily on the scenario. For example – if you can cut the camera, you have many more options than when is it 100% free and not constrained with zero cuts. It also depends how much budget do you have – both in terms of milliseconds to spend on extra lights as well as in terms of lighting artists time.
Sometimes a single slider can make scene look much better and while localized exposure / localized tonemapping can have its own problems, I recommend adding it to your artists’ toolset to make their lives easier!
If you are interested a bit more in the dynamic range, tonemapping and gamma operations, check out my second post in the mini-series.
References
http://renderwonk.com/publications/s2010-color-course/ SIGGRAPH 2010 Course: Color Enhancement and Rendering in Film and Game Production
http://gpuopen.com/gdc16-wrapup-presentations/ “Advanced Techniques and Optimization of HDR Color Pipelines”, Timothy Lottes.
https://en.wikipedia.org/wiki/Zone_System
http://photography.tutsplus.com/tutorials/understanding-using-ansel-adams-zone-system–photo-5607
https://luminous-landscape.com/zone-system/
https://en.wikipedia.org/wiki/Dodging_and_burning
https://en.wikipedia.org/wiki/Graduated_neutral-density_filter
https://en.wikipedia.org/wiki/Polarizing_filter_(photography)

excellent post exploring localized tonemapping. I was stunned with how good lightroom does it too. you can also input multiple hdr into lightroom and the result is quite good. I am interested if there is algorithm how light room calculate it or your math localized tone mapping?
Most probably Lightroom operates on Laplacian pyramid of the HDR image and works on every resolution separately. Obviously their algorithm is proprietary so I can only guess. 🙂
Great write-up! I had no idea that the shadows/highlights control in LR worked that way. Also, what is the visual impact/benefit of adjustable cross-talk? I only know the basic definition but am not familiar with how it can be used as an image control.
Hey, main point of this parameter is to let artist control how much very bright, but very saturated colors will preserve their saturation under tonemapping. Imagine insanely “hot” red particle effect with RGB light radiance like (10e6, 0.5, 0.5). Should it stay so red under the tonemapping, or is slightly pinkish value desired, or maybe even fully blown out white? The answer kind of depends, some games prefer more desaturated whites (classic Uncharted tonemapping curve), some want more colorful art direction and particle effects. Adjustable crosstalk lets artists decide on this behavior.
I see! That makes a lot of sense. I’ve encountered the same problem, but hadn’t come across this solution.
Thanks again for this post that has been so thought-provoking. I have two other related questions:
In your experience, do artists use exposure lights to adjust all lighting contribution, or just diffuse/specular indirect lighting?
Is the highlights/shadows adjustment an exposure adjustment applied to screen regions via a luminosity curve extracted from a bloom buffer?
Thanks for your comment. 🙂
Artists use exposure lights like “brush strokes” and not really caring about direct/indirect lighting. When there is art review of a level, art dir or lead level design or someone says “hmm, I like this, but it’s a bit too dark here and we need to have combat area” and then if there is no point in enhancing exposure (as for example there are some bright elements in the scene) or no natural way to add “natural” light sources, we would use exposure lights. They are also extremely cheap (no BRDF whatsoever).
“Is the highlights/shadows adjustment an exposure adjustment applied to screen regions via a luminosity curve extracted from a bloom buffer?” Yes and no… kind of. 🙂 Luminance extraction happens much earlier – based only on diffuse lighting without albedo. We don’t want dark/bright textures to affect the exposure and contribute to “washing out” effect similar to a gamma curve. It is also blurred bilaterally, clamped + modified to avoid extreme effects.
Cheers!
Hy Bart. Thank you for this interresting post concerning the local tone mapping. This has also biological reality (center-surround visual system organisation) an could be a fantastic tool to compensate our low HDR displays.
One question though concerning the luminance extraction mentionned here:
I experience some issues with the fact that albedo is completely ignored for this step.
I end up usually with my cloudy skies mostly over exposed because my exposure corrections are set to correctly expose the settings which have a much lower albedo than the clouds and the fog.
Couldn’t we imagine using half white luminance/half white albedo to reach a sweet spot?
Hey Titou,
You are correct re the fact that luminance computation is quite complicated process and hybrid approaches tend to work best. For example, I suggested not taking surface albedos into account, but at the same time I take fog into account. I am not sure if it can be more rigorously “formalized”, but intuitively I like to think about something whether it is a local effect, or affects human perception of whole ambiance. So fog is essential part of environment and we expect it to be “average”, while local albedo shouldn’t cause adapt, as it is local distinction between dark and bright objects. We expect snow to be white, almost blinding and we expect charcoal to be almost black.
Case with clouds you mention is very interesting, as I think it might be beneficial to slightly over-expose them – as perception really sees this sky as being very bright.
As I said though – I don’t know if there is a way of formalizing it, if there is some rigorous research (could be quite easy, just measure pupil dilation?) on it, so apologies if it sounds handwavy.
Cheers!
Pingback: Graphics Development Stuff | Joy Machine
Pingback: Steel Hunters - Post-Stack Tuning | Joy Machine
Pingback: Don’t Convert sRGB U8 to Linear U8! « The blog at the bottom of the sea
Hi there! Was wondering if you could talk about how you set up the bilateral filter and it’s application. This seems to be a crucial part of your solution (which you sort of skipped over). Also are you generating a filtered mip chain or just multi-sampling the full resolution image buffer? Any implementation details or suggestions would be appreciated.. 😉
Hi Lucas! I never described those, because I never got to really improving significantly the naive approach I described there. I have left video games since then, but generally the biggest challenge for real-time rendering is doing it very efficiently – even simple wide radius bilateral filter becomes prohibitive in such scenario. My advice would be to look at bilateral grid https://people.csail.mit.edu/sparis/publi/2007/siggraph/Chen_07_Bilateral_Grid.pdf with maybe 2-3 levels and instead of scattering, gathered directly into very low resolution textures. This could run in real time and serve as an improvement compared to just blurring in low resolution.
That paper is quite helpful indeed. I hadn’t seen that one before. Low freq yet fairly accurate AND temporally stable. Check, check and check 🙂 Cheers!
Pingback: Dynamic local exposure / geek magazine – Designers story
Pingback: Bilinear texture filtering – artifacts, alternatives, and frequency domain analysis | Bart Wronski
Pingback: Exposure Fusion – local tonemapping for real-time rendering | Bart Wronski
Interesting read. Also FYI, here’s the updated link to Tim Lottes’ 2016 GDC talk: http://gpuopen.com/wp-content/uploads/2016/03/GdcVdrLottes.pdf