
Recently I was working on console version depth of field suitable for gameplay – so simple, high quality effect, running with a decent performance on all target platforms and not eating big percent of budget.
There are tons of publications about depth of field and bokeh rendering, personally I like photographic, circular bokeh and it was also request from the art director, so my approach is doing simple poisson-like filtering – not separable, but achieves nice circular bokeh. Nothing fancy to write about.
If you wanted to do it with other shapes, I have two recommendations:
1. For hexagon shape a presentation how to approximate it by couple passes of separable skewed box blurs from John White, Colin Barré-Brisebois from Siggraph 2011. [1]
2. Probably best for “any” shape of bokeh – smart modern DirectX 11 / OpenGL idea of extracting “significant” bokeh sprites by Matt Pettineo. [2]
But… I looked at some old screenshots of the game I spent significant part of my life on – The Witcher 2 and missed its bokeh craziness – just look at this bokeh beauty! 🙂


I will write a bit about technique we used and aim to start small series about getting “insane” high quality bokeh effect aimed only for cutscenes and how to optimize it (I already have some prototypes of tile based and software rasterizer based approaches).
Bokeh quality
I am a big fan of analog and digital photography, I love medium format analog photography (nothing teaches you expose and compose your shots better than 12 photos per quite expensive film roll plus time spent in the darkroom developing it 🙂 ) and based on my photography experience sometimes I really hate bokeh used in games.
First of all – having “hexagon” bokeh in games other than aiming to simulate lo-fi cameras is very big mistake of art direction for me. Why?
Almost all photographers just hate hexagonal bokeh that comes from aperture blades shape. Most of “good quality” and modern lenses use either higher number or rounded aperture blades to help fight this artificial effect as this is something that photographers really want to fight.
So while I understand need for it in racing games or Kayne & Lynch gonzo style lo-fi art direction – it’s cool to simulate TV or cheap cameras with terrible lenses, but having it in either fantasy, historical or sci-fi games just makes no sense…
Furthermore, there are two quite contradictory descriptions of high quality bokeh that depend on the photo and photographer itself:
- “Creamy bokeh”. For many the gold standard for bokeh, especially for portraits – it completely melts the background down and allows you to focus your attention on the main photo subject, a person being photographed. Irony here is that such “perfect” bokeh can be achieved by simple and cheap gaussian blur! 🙂

- “Busy bokeh” or “bokeh with personality” (the second one is literal translation from Polish). Preference of others (including myself), circular or ring-like bokeh that creates really interesting results, especially with foliage. It gives quite “painterly” and 3D effect showing depth complexity of photographed scene. It was characteristic to many older lenses, Leica or Zeiss that we still love and associate with golden age of photography. 🙂

Both example photos are taken by me on Iceland. Even first one (my brother) taken with portrait 85mm lens doesn’t melt the background completely – a “perfect” portrait lens (135mm + ) would.
So while the first kind of bokeh is quite cheap and easy to achieve (but it doesn’t eat couple millis, so nobody considers it “truly next gen omg so many bokeh sprites wow” effect 😉 ), the second one is definitely more difficult and requires having arbitrary, complex shapes of your bokeh sprites.
The Witcher 2 insane bokeh
So… How did I achieve bokeh effect in The Witcher 2? Answer is simple – full brute-force with point sprites! 🙂 While other developers proposed it as well at similar time [3], [4], I believe we were the first ones to actually ship the game with such kind of bokeh and we didn’t have DX10/11 support in our engine, so I wrote everything using vertex and pixel shaders.
Edit: Thanks to Stephen Hill for pointing out that actually Lost Planet was first… and much earlier, in 2007! [8]
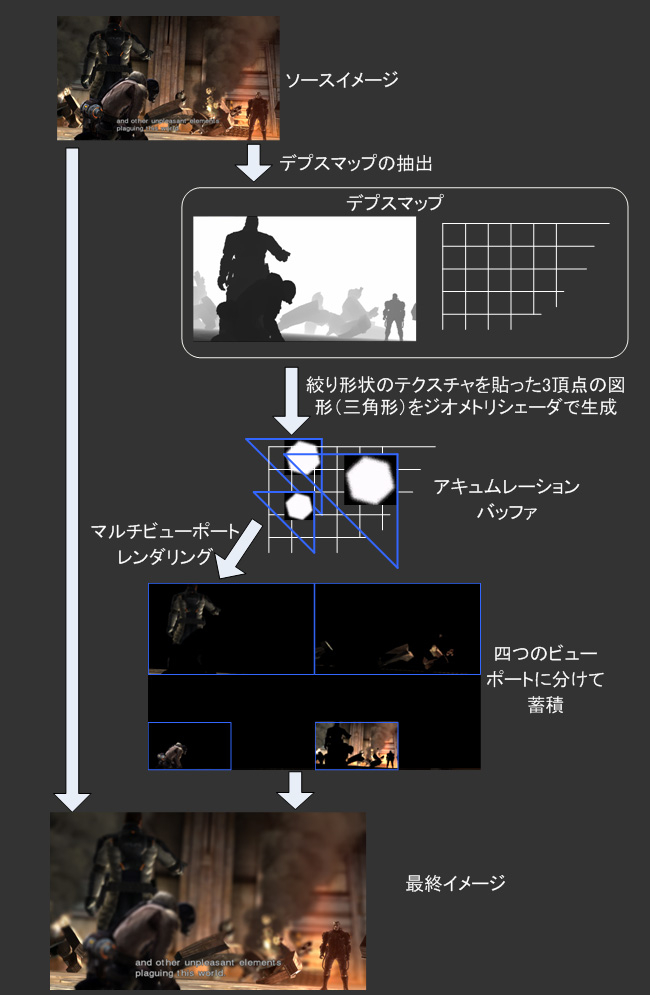
The algorithm itself looked like:
- Downsample the scene color and circle of confusion calculated from depth into half-res.
- Render grid of quads – every quad corresponding to one pixel of half-res buffer. In vertex shader fetch depth and color, calculate circle of confusion and scale the sprite accordingly. Do it only for the far CoC – kill triangles corresponding to in-focus and near out-of-focus areas by moving them outside the viewport. In pixel shader fetch the bokeh texture, multiply by it (and by inverse sprite size squared) and output RGBA for premultiplied-alpha-like result. Alpha-blend them additively and hope for enough memory bandwidth.
- Do the same second time, for in-focus depth of field.
- Combine in one fullscreen pass with in-focus areas.
Seems insane? Yes it is! 🙂 Especially for larger bokeh sprites the overdraw and performance costs were just insane… I think that some scenes could take up to 10ms on just bokeh on some latest GPUs at that time…
However, it worked due to couple of facts:
- It was special effect for “Ultra” configuration and best PCs. We turned it off even in “High” configuration and had nice and optimal gaussian blur based depth of field for them.
- It was used only for cutscenes and dialogues, where we were willing to sacrifice some performance for amazing and eye-candy shots and moments.
- We had very good cutscene artists setting up values in “rational” way, they were limiting depth of field to avoid such huge timings and to fit everything in the budget. Huge CoC was used in physically based manner (telephoto lens with wide aperture) – for very narrow angle shots where usually there was one character and just part of the background being rendered – so we had some budget to do it.
Obviously, being older and more experienced I see how many things we did wrong. AFAIR the code for calculating CoC and later composition pass were totally hacked, I think I didn’t use indexed draw calls (so potentially no vertices reusing) and multi-pass approach was naive as well – all those vertex texture fetches done twice…
On the other hand, I think that our lack of DX10+ kind of saved us – we couldn’t use expensive geometry shaders, so probably vertex shaders were more optimal. You can check some recent AMD investigations on this topic with nice numbers comparisons – and it is quite similar to my experiences even with the simples geometry shaders. [5]
Crazy scatter bokeh – 2014!
As I mentioned, I have some ideas to optimize this effect using modern GPU capabilities as UAVs, LDS and compute shaders. Probably they are obvious for other developers. 🙂
But before I do, (as I said, I hope this to be whole post series) I reimplemented this effect at home “for fun” and to have some reference.
Very often at home I work just for myself on something that I wouldn’t use in shipping game, I’m unsure if it will work or will be shippable or simply want to experiment. That’s how I worked on Volumetric Fog for AC4 – I worked on it in my spare time and on weekends at home and realizing that it actually can be shippable, I brought it to work. 🙂
Ok, so some results for scatter bokeh.


I think it is quite faithful representation of what we had quality-wise. You see some minor half-res artifacts (won’t be possible to fully get rid of them… unless you do temporal supersampling :> ) and some blending artifacts, but the effect is quite interesting.
What is really nice about this algorithm is possibility of having much better near plane depth of field with better “bleeding” onto background (not perfect though!)- example here.

Another nice side-effect is having possibility of doing “physically-based” chromatic aberrations.
If you know about physical reasons for chromatic aberrations, you know that what games usually do (splitting RGB and offsetting it slightly) is completely wrong. But with custom bokeh texture, you can do them accurately and properly! 🙂
Here is some example of bokeh texture with some aberrations baked in (those are incorrect, I should scale color channels not move, but done like that they are more pronounced and visible on such non-HDR screenshots).

And examples how it affects image – on non-HDR it is very subtle effect, but you may have noticed it on other screenshots.


Implementation
Instead of just talking about the implementation, here you have whole source code!
This is my C# graphics framework – some not optimal code written to make it extremely easy to prototype new graphics effects and for me to learn some C# features like dynamic scripting etc.
I will write more about it, its features and reasoning behind some decisions this or next week, meanwhile go download and play for yourself! 🙂
Licence to use both this framework and bokeh DoF code is 100% open source with no strings attached – but if you publish some modifications to it / use in your game, just please mention me and where it comes from (you don’t have to). I used Frank Meinl Sponza model [5] and SlimDX C# DirectX 11 wrapper [6].
As I said, I promise I will write a bit more about it later.
The effect quality-wise is 100% what was in The Witcher 2, but there are some improvements performance-wise from Witcher 2 effect.
- I used indexed draw. Pretty obvious.
- I didn’t store vertices positions in array, instead calculate them procedurally from vertex ID. On such bandwidth heavy effect everything that avoids thrashing your GPU caches and allows to use ALU instead will help a bit.
- I use single draw call for both near and far layers of DoF. Using MRT would be just insane, geometry shaders use is a performance bottleneck, so instead I just used… atlasing! 🙂 Old-school technique, but it works. Sometimes you can see edge artifacts from it (one plane leaks into atlas space of the other one) – it is possible to remove them in your pixel shader or with some borders, but I didn’t do it (yet).
I think that this atlasing part might require some explanation. For bokeh accumulation I use double-width texture, and spawn “far” bokeh sprites into one half, while the other ones in the second one. This way, I avoid overdraw / drawing them multiple times (MRT), geometry shaders (necessary for texture arrays as render targets) and avoid multiple vertex shader passes. Win-win-win!
I will write more about performance in later – but you can try for yourself and check that it is not great, I have even seen 11ms with extremely blurry close DoF plane filling whole screen on GTX Titan! 🙂
References
1. “More Performance! Five Rendering Ideas from Battlefield 3 and Need for Speed: The Run”, John White, Colin Barré-Brisebois http://advances.realtimerendering.com/s2011/White,%20BarreBrisebois-%20Rendering%20in%20BF3%20(Siggraph%202011%20Advances%20in%20Real-Time%20Rendering%20Course).pptx
2. “Depth of Field with Bokeh Rendering”, Matt Pettineo and Charles de Rousiers, OpenGL Insights and http://openglinsights.com/renderingtechniques.html#DepthofFieldwithBokehRendering http://mynameismjp.wordpress.com/2011/02/28/bokeh/
3. The Technology Behind the DirectX 11 Unreal Engine Samaritan Demo (Presented by NVIDIA), GDC 2011, Martin Mittring and Bryan Dudash http://www.gdcvault.com/play/1014666/-SPONSORED-The-Technology-Behind
4. Secrets of CryENGINE 3 Graphics Technology, Siggraph 2011, Tiago Sousa, Nickolay Kasyan, and Nicolas Schulz http://advances.realtimerendering.com/s2011/SousaSchulzKazyan%20-%20CryEngine%203%20Rendering%20Secrets%20((Siggraph%202011%20Advances%20in%20Real-Time%20Rendering%20Course).ppt
5. Vertex Shader Tricks – New Ways to Use the Vertex Shader to Improve Performance, GDC 2014, Bill Bilodeau. http://amd-dev.wpengine.netdna-cdn.com/wordpress/media/2012/10/Vertex-Shader-Tricks-Bill-Bilodeau.ppsx
6. Crytek Sponza, Frank Meinl http://www.crytek.com/cryengine/cryengine3/downloads
7. SlimDX
8. Lost Planet bokeh depth of field http://www.beyond3d.com/content/news/499 http://www.4gamer.net/news/image/2007.08/20070809235901_21big.jpg

Pingback: C#/.NET graphics framework | Bart Wronski
Pingback: Voigtlander Nokton Classic 40mm f1.4 M on Sony A7 Review | Bart Wronski
Pingback: Physically Based Camera Rendering | extremeistan
I didn’t know you worked on Witcher 2, amazing !
I’d love to port this to DX9 but I suspect I won’t be able to procedurally calculate the vertices positions using vertex ID in DX9 (AFAIR they’re not supported in SM3.0). Is there any anyway to circumvent this ? Can you please point me to a workaround ?
There is no problem to create vertex buffer that will contain “vertex id” as one of vertex attributes. 🙂
Like so ?
http://msdn.microsoft.com/en-us/library/windows/desktop/bb204869(v=vs.85).aspx
I’ll check it out thanks !
Pingback: Designing a next-generation post-effects pipeline | Bart Wronski
Hey, I’m currently experimenting with per-pixel scattered DoF, and was wondering if you know a solution to a problem I’m having. With large blur radiuses, I’m getting artifacts, especially noticeable in the near-blur. I’m seeing slightly-blurred objects bleeding over very-blurred objects, due to there being no depth-awareness in the scatter pass. But I can’t think of a way to avoid this?
Hey! What method of alpha blending are you using? Did you try additive blend with pre-multiplied alpha and alpha divide reconstruction? It is not proper “ordered” alpha blending simulation, but in most cases (CoC differences not that big in case of objects close to each other) works fine… Even better solution could be achieved via http://jcgt.org/published/0002/02/09/ but IMO definitely not worth cost in case of already very overdraw heavy DoF.
To be honest I haven’t really seen any strong artifacts or visible problems in W2 or in my experiments, but just theoretically they should appear just as you describe them. Maybe you have some screenshots?
Hey! Thanks for the reply, yeah I’m using additive blending with pre-multiplied alpha, then taking the average using a divide.
I think you’re correct that the reason for the bug is that it’s not properly ordered alpha blending. I’ve recreated the issue in your demo, with extreme CoC to show the issue clearly:
https://drive.google.com/file/d/0B0lYNXYNqNwBV0VmWnYzdzFJd2s/view?usp=sharing
https://drive.google.com/file/d/0B0lYNXYNqNwBa0hRWXZ0eC1fNGM/view?usp=sharing
I’m thinking of improving it as part of an optimisation that the 3D Mark guys used to reduce fill-rate. If I extend your atlas idea to scatter larger CoC polygons to downsized parts of the atlas for increasing bands of CoC, I’ll end up with a bunch of ‘layers’ where each layer represents larger and larger CoC. Each layer would occupy a different part of the atlas. I can then combine these layers in the resolve stage to partially avoid the issue in the screenshots… I hope!
Yes, this is interesting solution and optimization at the same time. 🙂 Layering should help ad get back some bw. But interesting how you can easily produce such artifacts in artificial test case – while in W2 they were never visible, as DoF is used for plane/depth separation and you want to clearly divide your image in focused/near/far parts. 🙂
Pingback: Anamorphic lens flares and visual effects | Bart Wronski
Hi, I’ve been trying integrating this approach in Blender and it works really well for the background but the foreground is too opaque at object silhouettes instead of merging smoothly with the background. Currently I’m weighting the colors with the inverse area of the pixel and at the resolve phase I divide by the sum of the weights, This means we always have opaque alpha, but I was thinking that maybe in the foreground case there could be an exception to this rule to properly account for the transparency of the layer…would you happen to have any suggestions there?
Hi, you can still try to use full reconstructed color from the premultiplied alpha as the RGB values for foreground layer composing, but some function of non-divided, accumulated alpha channel as the composition alpha. (obviously it assumes that forward DoF layer is rendered and composed separately!).
This is the solution that I used in Witcher 2 and it involved some tweaking / fudging for the alpha ramp composition to look good – some rescaling / biasing. This is also solution used in my framework as an example – but less tweaked one. Check also previous comments, everyone has this problem and without proper depth sorting and depth testing per every sprite there will be always some edge cases and artifacts…
Cheers!
Thanks for the suggestions, I will check those out and see what I come up with. I suspect order independent transparency is not really the issue here since the technique is just a weighted sum of colors which is a commutative operation. Rather, the issue (that Richard Kettlewell also has as far as I can see) is that the color at the plane of focus overrides the near field blurry pixels.
If I find a better solution I’ll be sure to post an update here.
If you look at the provided sample, you will see that near/focus/far go to different surfaces and get resolved separately. Furthermore, they are different resolutions for the perf reasons. 🙂 you need only to apply different blend operator. Cheers!
Pingback: Metal Gear Solid V – Graphics Study | Digitators
Are these rendering techniques applicable to DOF/bokeh rendering for photos?
Say you take a photo with a digital camera and want to apply DOF?
For this to work you need to have a depth map saved – many newer phones offer such options. But if you have your final photo + depth map image, all of those techniques apply indeed!
I have a depth map for a photo. How much does the quality of the depth map matter?
If the depth map has artifacts (noise, etc.) how much does quality of the post processed DOF suffer? Or are most artifacts just due to doing this in image space?
The depth map quality is crucial. If you look at reviews of “bokeh” effect of phones, any mentioned problems or artifacts always come from the depth map estimation… The artifacts from image space processing are less objectionable and are only problematic for near out-of-focus objects (which phone cameras usually don’t even simulate!).
Saw this right after https://bartwronski.com/2017/08/06/separable-bokeh/
I’m so happy this article exists! It is really inspiring to me. The solution presented here is awesome, it really shows how hacky video game graphics are.
Pingback: Why are video games graphics (still) a challenge? Productionizing rendering algorithms | Bart Wronski
> Instead of just talking about the implementation, here you have whole source code!
It seems the dropbox link is broken.
This artical is inspiring. I’m current working on the dof thing.
Where can I find the implementation?
Here’s the link: https://www.dropbox.com/s/g3t4oywdbhfc2a8/bokeh_dof01.7z?dl=1 I’ll update the post, it must have broken with some Dropbox update. Thanks for finding the issue and notifying me!