
Screen-space deferred decals are a very popular technique. There were so many presentations and blog posts about it that I will just list couple of them (just a first google search results page to be honest…) in no particular order:
- Lighting and simplifying Saints Row: The Third,
- Screen Space Decals in Warhammer 40000: Space Marine,
- Drawing Stuff On Other Stuff With Deferred Screenspace Decals,
- Deferred decals,
- Volume decals,
- Deferred Decal setup in CRYENGINE.
Therefore I think it wouldn’t be exaggeration to call it “industry standard”.
The beauty of screen-space decals used together with deferred rendering is that they provide further “defer” of another part of the rendering pipeline – in this case of layered materials and in general – modifications to the rendered surface, both static and dynamic. Just like you can defer the actual lighting from generating the material properties (in deferred lighting / shading), you can do it as well with composite objects and textures.
You don’t need to think about special UV mapping, unwrapping, shader or mesh permutations, difficult and expensive layered material shaders, even more difficult pipelines for artists (how to paint 2 partially overlapping objects at once? How to texture it in unique way depending on the asset instance?) or techniques as complex and hard to maintain as virtual texturing with unique space parametrization.
Instead just render a bunch of quads / convex objects and texture it in the world space – extremely easy to implement (matter of hours/max days in complex, multi-platform engines), very easy to maintain (usually only maintenance is making sure you don’t break MRT separate blending modes and normals en/decoding in the G-Buffer) and easy for artists to work with. I love those aspects of screen-space decals and how easily they work with GBuffer (no extra lighting cost). I have often seen the deferred decals as one of important advantages of the deferred shading techniques and cons of the forward shading!
However, I wouldn’t write this post if not for a serious deferred screen-space decals problem that I believe every presentation failed to mention!
Later post edit: Humus actually described this problem in another blog post (not the original volume decals one). I will comment on it on one of later sections.
(Btw. a digression – if you are a programmer, researcher, artist, or basically any author of talk or a post – really, please talk about your failures, problems and edge cases! This is where 90% of engineering time is spent and mentioning it doesn’t make any technique any less impressive…).
Dirty screen-space decal problem
Unfortunately, in all those “simple” implementations presented in blog posts, presentations and articles there is a problem with the screen space decals that makes them in my opinion unshippable without any “fix” or hack in PS4/XboxOne generation of AAA games with realistic and complex lighting, materials and sharp, anisotropic filtering. Funnily enough, I found only one (!) screenshot in all those posts with such camera angle that presents this problem… Edge artifacts. This is a screenshot from the Saint Row: The Third presentation.

Problem with screen-space decals – edges. Source: Lighting and Simplifying Saints Row: The Third
I hope the problem is clearly visible on this screenshot – some pixels near the geometric edges perpendicular to the camera do not receive the decal properly and its background is clearly visible. I must add that in motion such kind of artifacts looks even worse. 😦 Seeing it in some other engine, I suspected at first many other “obvious” different reasons that cause edge artifacts – half-texel offsets, wrong depth sampling method, wrong UV coordinates… But the reason for this artifact is quite simple – screen space UV derivatives and the Texture2D.Sample/tex2DSample instruction!
Edit: there are other interesting problems with the screen-space / deferred decals. I highly recommend reading Sébastian Lagarde and Charles de Rousiers presentation about moving Frostbite to PBR in general (in my opinion the best and most comprehensive PBR-related presentation so far!), but especially section 3.3 about problems with decals and materials and lighting.
Guilty derivatives
The guilty derivatives – source of never ending graphics programmers frustrations, but also a solution to a problem unsolved otherwise. On the one hand a necessary feature for antialiasing of textures and the texturing performance, on the other hand a workaround with many problem of its own. They cause your quad overshading and inability to handle massive amounts of very small triangles (well, to be fair there are some more other reasons like vertex assembly etc.), they are automatically calculated for textures only in pixel shaders (in every other shader stage to use texturing you need to specify the LOD/derivatives manually), their calculations are imprecise and possibly low quality; they can cause many types of edge artifacts and are incompatible with jittered rasterization patterns (like flip-quad).
In this specific case, let’s have a look at how the GPU would calculate the derivatives, first by looking how per quad derivatives are generated in general.

Rasterized pixels – note – different colors belong to the different quads.
In the typical rendering scenario and a regular rendering (no screen-space techniques) of this example small cylinder object, there would be no problem. Quad containing pixels A and B would get proper derivatives for the texturing, different quad containing pixels C and D would cause some overshading, but still have proper texture UV derivatives – no problem here as well (except for the GPU power loss on those overshaded pixels).
So how do the screen-space techniques make it not work properly? The problem lies within the way the UV texture coordinates are calculated and reprojected from the screen-space (so the core of this technique). And contrary to the triangle rasterization example, the problem with decal being rendered behind this object is not with the pixel D, but actually with the pixel C!
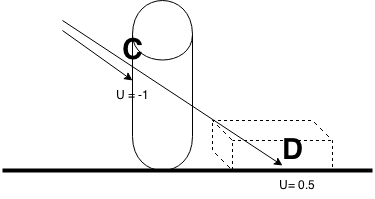
Effect of projecting reconstructed position into decal bounding box
We can see on this diagram how UVs for the point C (reprojected from the pixel C) will lie completely outside the bounding box of the decal (dashed-line box), while the point D has proper UV inside it.
While we can simply reject those pixels (texkill, branch out with alpha zero etc. – doesn’t really matter), unfortunately they would contribute to the derivatives and mip level calculation.
In this case, the calculated mip level would be extremely blurry – the calculated partial derivative sees a difference of 1.5 in the UV space! As usually the further mip levels contain mip-mapped alpha as well then we end up with almost transparent alpha from the alpha texture or bright/blurred albedo and many kinds of different edge artifacts depending on the decal type and blending mode…
Other screen-space techniques suffering
Screen-space/deferred decals are not the only technique suffering from this kind of problems. Any kind of technique that relies on the screen-space information reprojected to the world space and used as the UV source for the texturing will have such problems and artifacts.
Edit: The problem of mip-mapping, derivatives and how screen-space deferred lighting with projection textures can suffer from it was described very well by Aras Pranckevičius.
Other (most common) examples include projection textures for the spot-lights and the cubemaps for the environment specular/diffuse lighting. To be honest, in every single game engine I worked with there were some workarounds for this kind of problems (sometimes added unconsciously 🙂 more about it in on of the next sections).
Not working solution – clamping the UVs
The first, quite natural attempt to fix it is to clamp the UVs – also for the discarded pixels, so that derivatives used for the mip-mapping are smaller in such problematic case. Unfortunately, it doesn’t solve the issue; it can make it less problematic of even completely fix it when the valid pixel is close to the clamped, invalid one, but it won’t work in many other cases… One example would be a having an edge between some rejected pixels close to U or V 0 and some valid pixels close to U or V 1; In this case still we get full mip chain dropped due to huge partial derivative change within this quad.
Still, if you can’t do anything else, it makes sense to throw in there a free (on most modern hardware) saturate instruction (or instruction modifier) for some of those rare cases when it helps…
Brutal solution – dropping mip-maps
I mentioned quite natural “solution” that I have seen in many engines and that is an acceptable solution for most of other screen space techniques – not using mip-maps at all. Replace your Sample with SampleLevel and the derivative and mip level problem is solved, right? 😉
This works “ok” for shadow maps – as the aliasing is partially solved by commonly used cascaded shadow mapping – further distances get lower resolution shadow maps (plus we filter some texels anyway)…
It is “acceptable” for the projection textures, usually because they are rendered only when being close to the camera because of a) high lighting cost b) per-scene and per-camera shot tweaking of lights.
It actually often works well with the environment maps – as lots of engines have Toksvig or other normal variance to roughness remapping and the mip level for the cubemap look-up is derived manually from the roughness or gloss. 🙂
However, mip mapping is applied on textures for a reason – removing aliasing and information in frequency higher than rasterizer can even reproduce. For things like shiny, normal mapped deferred decals like blood splats the effect of having no mip maps can be quite extreme and the noise and aliasing unacceptable. Therefore I wouldn’t use this as a solution in a AAA game, especially if deferred, screen-space decals are used widely as a tool for environment art department.
A middle ground here could be just dropping some further mip maps (for example keeping mips 0-3). This way one could get rid of extreme edge artifacts (when sampling completely invalid last mip levels) and still get some basic antialiasing effect.
Possible solution – multi-pass rendering
This is again a partial solution that would fix problems in some cases, but not in most. So the idea is to inject decal rendering in-between the object rendering with per-type object sorting. So for example “background”/”big”/”static” objects could be rendered first, decals projected on top of them and then other object layer.
This solution has many disadvantages – the first one is complication of the rendering pipeline and many unnecessary device state changes. The second one – the performance cost. Potential overshading and overdraw, wasting the bandwidth and ALU for pixels that will be overwritten anyway…
Finally, the original problem can be still visible and unsolved! Imagine a terrain with high curvature and projecting the decals on it – a hill with a valley background can still produce completely wrong derivatives and mip level selection.
Possible solution – going back to world space
This category of solutions is a bit cheated one, as it derives from the original screen-space decals technique and goes back to the world space. In this solution, artists would prepare a simplified version of mesh (in extreme case a quad!), map UV on it and use such source UVs instead of reprojected ones. Such UVs would mip-map correctly and won’t suffer from the edge artifacts.
Other aspects and advantages of the deferred decals technique would remain the same here – including possibility of software Z-tests and rejecting based on object ID (or stencil).

On the other hand, this solution is suitable only for the environment art. It doesn’t work at all for special effects like bullet holes or blood splats – unless you calculate source geometry and its UV on the CPU like in “old-school” decal techniques…
It also can suffer from wrong, weird parallax offset from the UV not actually touching the target surface – but in general camera settings in games never allow for extreme close ups so that it would be noticeable.
Still, I mention this solution because it is very easy on the programming side, can be good tool on the art side and actually works. It was used quite heavily in The Witcher 2 in the last level, Loc Muinne – as an easier alternative for messy 2nd UV sets and 2 layered, costly materials.
I’m not sure if those specific assets in this following screenshot used it, but such partially hand-made decals were used on many similar “sharp-ended” assets like those rock “teeth” on the left and right on the door frame in this level.

It is much easier to place them and LOD out quickly with distance (AFAIK they were present only together with a LOD 0 of a mesh) than creating multi-layered material system or virtual texture. So even if you need some other, truly screen-space decals – give artists possibility of authoring manual decal objects blended into the G-Buffer – I’m sure they will come up with great and innovative uses for them!
Possible solution – Forward+ decals
Second type of “cheated” solutions – fetch the decal info from some pre-culled list and apply it during the background geometry rendering. Some schemes like per-tile pre-culling like in Forward+ or clusterred lighting can make it quite efficient. It is hard for me to estimate the cost of such rendered decals – depends probably on how expensive are your geometry pixel shaders, how many different decals you have, are they bound on memory or ALU, can they hide some latency etc. One beauty of this solution is how easy it becomes to use anisotropic filtering, how easy is it to blend normals (blending happens before any encoding!), no need to introduce any blend states or decide what won’t be overwritten due to storage in alpha channel; Furthermore, it seems it should work amazingly well with MSAA.
Biggest disadvantages – complexity, need to modify your material shaders (and all of their permutations that probably already eat too much RAM and game build times), increased register pressure, difficulty debugging and potentially biggest runtime cost. Finally, it would work properly only with texture arrays / atlases, which add a quite restrictive size limitation…
Possible solution – pre-calculating mip map / manual mip selection
Finally, a most “future research” and “ideas” category – if you have played with any of them and have experience or simply would like to share your opinion about them, please let me know in comments! 🙂
So, if we a) want the mip-mapping and b) our screen-space derivatives are wrong, then why not compute the mip level or even the partial derivatives (for anisotropic texture filtering) manually? We can do it in many possible ways.
One technique could utilize in-quad communication (available on GCN explicitly or via tricks with many calls to ddx_fine / ddy_fine and the masking operations on any DX11 level hw) and compute the derivatives manually only when we know that pixels are “valid” and/or come from the same source asset (via testing distances, material ID, normals, decal mask or maybe something else). In case of zero valid neighbors we could fall back to using the zero mip level. In general, I think this solution could work in many cases, but I have some doubts about its temporal stability under camera movement and the geometric aliasing. It also could be expensive – it all depends on the actual implementation and used heuristics.
Another possibility is calculating the derivatives analytically during reconstruction, given the target surface normal and the distance from the camera. Unfortunately a limitation here is how to read the source mesh normals without the normal-mapping applied. If your G-Buffer layout has them lying somewhere (interesting example was in the Infamous: Second Son GDC 2014 presentation) around then great – they can be used easily. 🙂 If not, then IMO normal-mapped information is useless. One could try to reconstruct normal information from the depth buffer, but this is either not working in the way we would like it to be – when using simple derivatives (because we end up having exact same problem like the one we are trying to solve!) – or expensive when analyzing bigger neighborhood. If you have the original surface normals in G-Buffer though it is quite convenient and you can safely read from this surface even on the PC – as decals are not supposed to write to it anyway.
Post edit: In one older post Humus described a technique being a hybrid of the ones I mentioned in 2 previous paragraphs – calculating UV derivatives based on depth differences and rejection. It seems to work fine and probably is the best “easy” solution, though I would still be concerned by temporal stability of technique (with higher geometric complexity than in the demo) given that approximations are calculated in screen-space. All kinds of “information popping in and out” problems that exist in techniques like SSAO and SSR could be relevant here as well.
Post edit 2: Richard Mitton suggested on twitter a solution that seems both smart and extremely simple – using the target decal normal instead of surface normal and precomputing those derivatives in the VS. I personally would still scale it by per-pixel depth, but it seems like this solution would really work in most cases (unless there is huge mismatch of surface curvature – but then decal would be distorted anyway…). Anyway it seems it would work in most cases.
Final possibility that I would consider is pre-computing and storing the mip level or even derivatives information in the G-Buffer. During material pass, most useful information is easily available (one could even use CalculateLevelOfDetail using some texture with known UV mapping density and later simply rescale it to the target decal density – assuming that projection decal tangent space is at least somehow similar to the target tangent space) and depending on the desired quality it probably could be stored in just few bits. “Expensive” option would be to calculate and store the derivatives for potential decal anisotropic filtering or different densities for target triplanar mapping – but I honestly have no idea if it is necessary – probably depends what you intend to use the decals for.
This is the most promising and possibly cheap approach (many game GDC and Siggraph presentations proved that next-gen consoles seem to be quite tolerant to even very fat G-Buffers 🙂 ), but makes the screen-space decals less easy to integrate and use and requires probably more maintenance, editing your material shaders etc.
This idea could be extended way further and generalized towards deferring other aspects of material shading and I have discussed it many times with my industry colleagues – and similar approach was described by Nathan Reed in his post about “Deferred Texturing”. I definitely recommend it, very interesting and inspiring article! Is it practical? Seems to me like it could be, the first game developers who will do it right could convince others and maybe push the industry into exploring interesting and promising area. 🙂
Special thanks
I would like to thank Michal Iwanicki, Krzysztof Narkowicz and Florian Strauss for inspiring discussions about those problems and their potential solutions that lead to me writing this post (as it seems that it is NOT a solved problem and many developers try to workaround it in various ways).

Hey, great post!
Half related, but another major concern with screen Space decal is when using any kind of baked Lighting solution (directional light map for example). In this case the baked data are usually sampled during the gbuffer laydown meaning that any post modification like those from screen space decal will not be visible (update of the normal for example whereas the non modified normal have been use to sample the directional lightmap).
Like you i have speak about these troubles in the talk http://www.frostbite.com/2014/11/moving-frostbite-to-pbr/
Section 3.3 pbr And decal , without providing any solution.
Hi Seb, thanks for stopping by and a comment! 🙂 I have seen this section in your presentation and presenter notes (btw. nice coincidence, I had it opened at my work computer this whole week! 🙂 really amazing and comprehensive presentation, thanks again for sharing) and it nicely describes other important problems of deferred decals, more oriented on material, BRDF and lighting side. I’ll add it into my post as a reference.
And for the problem you describe here I don’t think there is any other solution than “deferring” resolving baked lighting after decal blending? 😦 Maybe this Forward+-style decals I have suggested in the post?
Cheers!
Exactly, defering Baked lighting will be a solution. But for lightmap it require to store uv+derivative+lightmapID.
You could also try the guerilla way And try to produce a super dense array of lightprobe to replace lightmap but then need to fight light leaking. Still it doens’t solve several artifacts like the one you mention.
The golden way is of course the F+ decals : work with transparent And opaque, no screen Space dérivative artifact, perfect blending (think normal Map). But it will put constraint on artists side (blend mode flexibility mainly) without speaking about performance. UE4 has some kind of hybrid version where they render decal ahead of gbuffer but have some cons and pros of everything above.
Still I have the feeling that decal in the spirit of artists are still use the non pbr way. Many request decal with multiply diffuse blend mode. I can see the artistic usage for it but restricting everything to lerp (as for multilayer material) will help with decal. Also without considering F+ having per channel alpha weight for blending could help (dynamically masking channel per blend mode is sadly too costly in term of mEmory due to the combinatorial explosion of prebake renderstate for new api And the large number of blend mode desire for artists).
Was just random toughts 🙂
I am experimenting right now, and it looks like just using ddx_fine/ddy_fine removes 90% of the artifacts if you use it with MinLod (http://petersikachev.blogspot.com/2018/10/minlod-cheap-method-to-increase-texture.html)
Pingback: Progress Report July 2019 | OGRE - Open Source 3D Graphics Engine